Showing posts with label blog hints. Show all posts

Monday, January 3, 2011

It's snowing on my blog!


Hellooooooo there!
Happy New year!
Even though the snow has finally melted and we are back into the 60's around here.....
it is still snowing on my blog!
Sloan noticed it...Did you?

I found this little snow tip on one of my favorite "bloggy help" blogsites.
Go here to check it out!

I feel like I have been just out of the loop the last few weeks.

I have really enjoyed the downtime and the non-schedule of the holidays, but I am ready to get back to my routine...and my routine could use a little revamping as well.
I am not ready to declare any goals just yet, but I am looking foward to catching up with all of you and reading about your hopes and dreams and good intentions for this year!

And...I am also looking forward to getting my house restored to it's pre-holiday look....you know...minus the droopy tree, the half eaten Christmas goodies, the piles of presents and gift bags and stuff, and the many mini lights hanging on the bushes and trees.
We have never been the type to rush the Christmas tree out to the curb....but it really is about time.
What about you?
Your decorations...are they tucked safely away for next year...or are they still hanging around?

It's great to be back in the loop!
Enjoy your week.

Tuesday, July 27, 2010

Blogging Etiquette...a Fairy Tale!

A few months ago, I found this little fairy tale....then I lost it....and when I found it again, I decided to post it for safe keeping ...and as a little lesson for us all!
It was written by Jenners over at "Life with a Little One... and More".
Click on the link to check out her blog! She is a wondeful writer!


Here is her story titled,
Goldilocks and the 3 Bloggers!
Once upon a time, a lovely young girl named Goldilocks was playing happily on the Internet while her little baby slept peacefully nearby. (Yes, she had a baby. She had struggled to put the baby to bed last night but now the wee babe was sleeping peacefully. This is a literary device called foreshadowing. The sleeping babe will come into play soon.) She was frolicking around on the nice safe haven that is Facebook -- completing quizzes, sending Easter Peeps to her peeps and struggling to understand what to put in the new empty box. After all, the prompt "Goldilocks Is..." had recently disappeared -- leaving her unsure of what to write. (Goldilocks wasn't a very bright or creative girl; she needed that prompt.)

As she was playing around, she accidentally clicked on a link that led her to a strange world -- the Land of Blog. "We're not in Facebook anymore," Goldilocks thought to herself (confusingly mixing up her story references). "All these pages look so different." But Goldilocks was intrigued...she wanted to see more.

She clicked on a little sign that said "Next Blog." Suddenly, a loud noise assaulted her ears. It was music playing loudly. Goldilocks didn't know where the music was coming from -- and the loud music woke up the wee babe. "Waaahhh....waaaahhhh," cried the babe. "What the flippin' hell?" thought Goldilocks, panicking. "What is happening?" She frantically clicked on "Next Blog" and the music blissfully stopped. "Oh my," thought Goldilocks. "I sure don't like that. The music scared the bejeezus out of me and woke up my sleeping baby. I sure don't want to visit that blog again!"

The new blog she had clicked to was much more peaceful...but it was taking an awfully long time to load. Goldilocks kept waiting...and waiting...and waiting...and then she lost interest and clicked "Next Blog."

The third blog was just right. No music was playing and the page loaded in under 5 seconds. "Wow," thought Goldilocks, "this blogger must have checked their blog loading speed at Pingdom and used some handy blog optimization tips found at MintBlogger. It loaded in just 3.9 seconds!"

Goldilocks decided to check out this fast-loading blog that didn't have music playing. She looked at the first post. But it was really hard to read. "This teeny tiny black type on a dark red background is really hard to read!," she thought. "I'm getting a headache." She clicked "Next Blog."

The next blog had posts that were in an easy-to-read font size and had dark text on a light background (the easiest on the eyes). But the post was long and and centered and hardly any paragraph breaks. Goldilocks soon lost patience. "Long blocks of centered type with little or no white space sure is hard to read," she thought. "I just don't think I can read anymore of this!" She clicked "Next Blog."

The third blog was just right. The font size was readable, the dark text on a light background was readable, the text was left justified (just like in books!), and there were lots of paragraph breaks to give her eyes a rest. "This is wonderful," thought Goldilocks. "Even though this post is long, the blogger obviously tried to make reading it as easy as possible by making some smart choices about type size, font, white space, text justification and page background! Plus the writing is so darn funny that I want to read the whole post!"

Goldilocks read to the end of the post and saw there was a place where she could leave a comment. "Oh," thought Goldilocks (whose nickname was Goldie, which is much shorter and easier to type ... so let's just call her Goldie from now on) "I want to tell this blogger how much I loved this post. I think I will leave a comment." She clicked on the comment link and a box popped up. Goldie happily typed her witty and erudite comment and hit the submit button. A strange word appeared. "Nichscieslgheelsdl?" thought Goldie. "What the heck does that mean? And why are the letters so twirly and hard to read? Apparently I have to type this strange word before I can submit my comment. Screw it. I'm moving on." So she clicked on "Next Blog."

The next blog also had a great post so Goldie decided to leave another comment. She was excited to see what her comment would look like when published. After all, this is part of the fun of leaving comments. But even though she didn't have to enter a pesky, nonsensical twisted up word, her comment didn't appear. "What the heck?" thought Goldie. "Where is it?" She finally noticed that the comment had to be approved by the blog owner. "Oh," thought Goldie, disappointed. She clicked on "Next Blog."

The next blog also had a great post that Goldie wanted to comment on. Hesitantly, she clicked on the comment button. Would she have to jump through hoops to let this blogger know what she thought? Would she get to see her comment appear on the post? She held her breath and clicked "Submit." No crazy words appeared and the comment appeared instantly on the post with all the other comments! This blog was just right.

"Awesome," thought Goldie. "This made it easy for me to leave a comment and have a bit of fun on this blog. I wonder if those other bloggers know that the crazy word verification thing is just to prevent spam from appearing on a blog and isn't really necessary. In fact, many blogs don't use it and they don't get spam!!! Plus, you could always turn it back on if you did develop a spam problem. And I wonder if the blogger with the comment moderation uses it so they don't miss any comments? Don't they know that they can have all their comments sent directly to their e-mail so they won't miss a single comment (even if someone leaves a comment on a very old post)? Plus, this way they can easily reply to their visitors via e-mail if needed. All they need to do is go to this easy tutorial or this one to find out how to set it up!"

Goldie sure was enjoying her visit in the Land of Blog. She decided to stay awhile and quickly amassed a huge blogroll that she tried to visit every day. The first blogger she liked had great stuff but seemed to post about five times a day. "I just can't keep up with all these posts," thought Goldie. "Although the blogger may want me to read all of the posts, I just can't do it. It is too much."

The second blogger that Goldie liked had some wonderful posts but then didn't post again for two weeks. Goldie had forgotten about the blog by the time the next post came around.

The third blogger posted once a day for 3 or 4 days during the week. "This is just right," thought Goldie. "The posts come often enough that I can form a relationship with this blogger but not so often that I can't easily keep up with the posts."

Eventually, Goldilocks created her own blog -- a blog that didn't play music, loaded in under 5 seconds, used a readable type size, used dark text on a light background, left-justified the type, had paragraph breaks on longer posts, did not use word verification or comment moderation, and had posts just 3 to 4 times a week. She was also sure to be a good hostess and visit the blogs of any new visitors and she tried to respond to comments via e-mail if possible. She also tried to visit the blogs of regular readers as much as she was able to let them know how much she appreciated their visits. All in all, Goldilocks had fun blogging and she lived happily ever after in the Land of Blog.

The End!

Just a few thoughts of my own!
I'm easy when it comes to reading blogs. Not much bothers me. If I don't want to hear muic, I press mute. If I have to go through a few extra steps to leave a comment, I will. If there isn't a photo with every blog post, I will still read it....usually. If I can't keep up with every post and leave a comment everyday, I know you all will forgive me.
Having said that though...I do think Goldilocks has a few interesting points!

What do you think? Anything to add?
Anyone?

Friday, June 25, 2010

Scrapblog header tutorial!

Do it yourself......for free!

I love to create things. From the moment I started blogging I knew I would have to find a way to create a header that fit me and my personal style. Of course, I looked all over the place for backgrounds and headers, hoping that one would stand out above all the rest. I saw so many that I loved and even used a couple at first....then I found Scrapblog...and I knew right away, that my new header was soon to be displayed!

I feel that I must warn you....once you begin creating in Scrapblog...you may spend hours and hours playing and editing and adding and creating, to the point that your family doesn't even miss you anymore. They just assume that you are on that computer....again!

I must also tell you that up to this point, everything I have done in Scrapblog has been free. There are several kits and backgrounds etc... that I would love to use...that are not free, however they are very reasonably priced and I do plan to purchase kits in the future for sure.
The examples that I show and the tutorial example were created using the free kits.

For my header, I decided on one without photos.
You will see that you can easily add photos to your header in Scrapblog. The possibilities are endless.


These are 2 of the headers I have made using Scrapblog.
I plan to change them with the seasons, while keeping the same header style. 


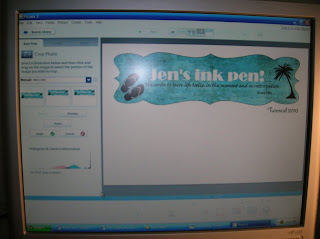
And this is the example header that I will show you how to make!


First, you will need to go to http://www.scrapblog.com/ and create an account.
Once you have signed in you can watch a little video tutorial on how their website works.


To begin making your header,  click on Start from Scratch. 
It will take

Then choose to use Quickmix.
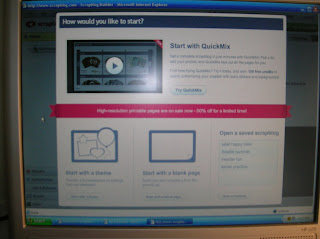
You will then select a kit.
For this example, I chose the travelogue kit. It is free. Most are not.
Even though you will not be adding a photo (for this example) you still need to upload at least one to use Quickmix.  *Go ahead and upload a few to see how cute a Scrapblog book is...you will want to come back and make many of those too!*
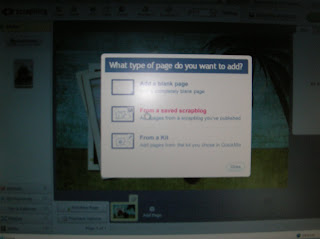
After you have seen how cute the book is...you will need to add a page....a blank page.
Now this is your canvas to work on your new header.
Keep in mind that a normal size banner header is rectangular...not 4x6 like a picture. For that reason, only use the top portion of the page to create your banner header. (You will crop off the bottom later.)

Start with a shape.
I use this one....I drag it over and then I stretch it out.
Then I fill in the shape with a color or a background paper. I chose the blue. Just drag it over into the shape.
Then, go get some stickers. I chose the flip flops and the palm tree. When you drag them over, they are huge. Just shrink them down and place them where you like them.
Then you can add the text.
Drag the text box over. Type your text. Stretch out the box, increase the font size to 72, then play with the fonts. I chose Broadway. Then change the color to white.

When you are finished, drag the text box onto the shape.
Then for the quote underneath, add another text box and repeat the process...until you have the size, color, and font that you like. Be creative. You will love it.
Soon you will have a header like mine.
Now this is where it gets a little tricky for me.
When you are all done...click on I'm finished. It will ask you what you would like to do. Click on share...and choose to see the options.

UPDATE:
This is where things are different now (May 2011)
After you create your header...just click on the little tool sign above the page at the bottom in your scrapblog book. It will allow you to save to your computer right there without going to Photobucket.
Then just crop it in Picassa and save it again.

You may choose whatever photo editing website you like. I use Photobucket and Picassa. Once you get the header over there, you will need to crop it so the bottom half of the picture (where all the white is) is gone.
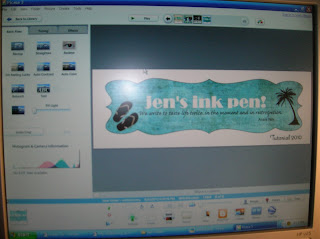
That new edited picture is the one that you want to save in a folder on your computer to use as the image for your header.
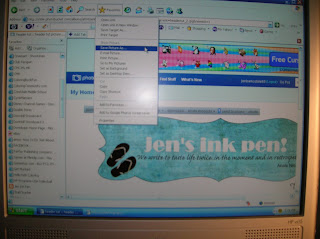
Then skip down to here from the UPDATE!
Then, just go into your blogger layout and choose header. Choose the image from the folder on your computer and be sure to say  use instead of  title and description.
You should see the image....then SAVE....say a little prayer (I always do) and go check out your new header.
I have not written a tutorial before....and this one was written with the assumption that there was some prior Blogger knowledge of headers in general. (mainly because the people who asked me to write this have customized headers, rather than the default headers.)
If you have any specific questions, please ask in the comments and I can elaborate on something if needed.

And remember, the possibilities are endless. You may come up with something completely different...like the first header I made, also in Scrapblog.
See what I mean. You can add pictures, borders, frames and all kinds of goodies depending on the kit that you choose to use.

It was cute...I never really loved it...and I wanted something different.

If you make a new header using Scrapblog, please come back and leave me a comment with a link. I would love to see what you come up with!

Have fun!

Tuesday, March 2, 2010

Adding a signature to your blog!

I have been wanting to add a fun signature to my blog, but of course I did not know how. Part of the fun of blogging is learning, trying, making a mess of things and then...getting it right. Just in case you need direction...or in case I forget how I did this in the first place..here is the website to make your own signature. Have fun!
http://www.mylivesignature.com/